
If your shoulder has been nagging you for weeks or even months, here’s what you need to know: starting a gentle workout for rotator cuff muscles often helps, even when things feel stiff or achy. Waiting until everything feels perfect tends to make things worse, not better.
Who This Workout Is For (And Who Should Wait)
This workout is designed for active adults dealing with mild to moderate shoulder discomfort or stiffness who want to improve strength and function safely at home. However, if you have experienced any of the following, please seek medical evaluation before starting:
- – Recent fall or trauma
- – Sudden weakness or inability to lift your arm
- – Major swelling or visible deformity
- – Constant severe night pain that doesn’t improve with position changes
- – Significant instability or feeling your shoulder slipping
If any of these apply, consult a healthcare provider before attempting this or any rotator cuff exercise routine.
A good rotator cuff workout should feel like work but not sharp pain. Expect some mild muscle fatigue or light soreness in the hours after. That’s normal. What’s not normal is sharp, catching, or stabbing pain during movement, or night pain that keeps waking you up. Those are signals to back off and get some guidance.
Many people can start with low-load rotator cuff exercises two to three days per week and notice gradual improvements over four to six weeks when they stay consistent. Progress tends to be steady rather than immediate or dramatic.
Here’s what this article will give you:
- – A simple daily routine you can do at home with minimal equipment
- – Clear progressions so you know when and how to make things harder
- – Safety tips to keep you out of trouble
- – Guidance on when to see a physical therapist in Greenville, SC
This routine is designed for active adults who want to lift, garden, play sports, and sleep without shoulder pain getting in the way.

What the Rotator Cuff Actually Does (And Why It Gets Irritated)
The rotator cuff is a team of four small muscles that wrap around your shoulder joint like a dynamic sleeve. Their names are supraspinatus, infraspinatus, teres minor, and subscapularis. You don’t need to memorize them. What matters is understanding their job: keeping the ball of your upper arm centered in the socket while your arm moves in all directions.
Think of these rotator cuff muscles as a set of guy wires on a tent pole. They don’t lift heavy loads by themselves, but they keep everything stable so the bigger muscles can do their work without the joint sliding around. When they’re strong and coordinated, your shoulder moves smoothly. When they’re weak or tired, the system starts to break down.
These muscles are working during everyday tasks you probably don’t think about. Reaching into the back seat of your car. Lifting a grandchild. Pressing a weight overhead at the gym. Serving a tennis ball. They fire constantly to keep your shoulder joint centered and safe.
When the rotator cuff gets weak or overloaded, other tissues pick up the slack. The bursa (a fluid-filled cushion) and the tendons themselves can get irritated from doing jobs they weren’t designed to handle. This often shows up as a dull ache on the outside of the shoulder, trouble sleeping on that side, or a catch when you reach overhead. The good news is that many people improve with the right combination of mobility and strengthening.
Common Reasons Your Rotator Cuff Hurts in Real Life
Most shoulder issues don’t come from one dramatic injury. They build up from a mix of small factors over time. That’s actually good news because it means there’s usually no single thing you broke and plenty you can improve.
Common contributors include repetitive overhead work like painting ceilings or stocking high shelves, heavy or unbalanced lifting without proper warmup, poor posture at a computer that rounds the shoulders forward, sudden spikes in workout load after a break, and age-related changes in tendon tissue that start showing up after forty. Repetitive, overhead motions are a common cause of rotator cuff injuries such as impingements and tears, with risk increasing as we age and wear accumulates.
Think about the real-life scenarios that add up. Weekend overhead pressing at the gym after sitting at a desk all week. Painting a room over a long Saturday. Hitting way more tennis serves than usual at Cleveland Park. A yard work marathon when the weather finally turns nice. Each of these can push the shoulder past what it’s ready to handle.
Stiffness in the neck or thoracic spine (the upper and middle back) can also force your rotator cuff to work overtime. When the shoulder blade can’t move freely on the rib cage, the small stabilizing muscles have to compensate. Same thing happens when the muscles around the shoulder blades are weak or poorly coordinated. Strong engagement of the shoulder blade is essential during rotator cuff exercises to avoid shoulder shrugging.
The hopeful part is that many of these factors tend to respond well to the right combination of mobility, stability, and progressive loading. You don’t have to stop moving. You just need to move smarter.
Before You Start: Safety Rules for Rotator Cuff Workouts
Before you dive into the exercises, read through these guardrails. They’ll help you get results without making things worse.
Pain guidelines: Some discomfort is expected when you’re working a sore shoulder. A mild, controllable level of pain (think 3 to 4 out of 10) that settles within 24 hours is usually acceptable. Sharp, catching, or worsening pain during or after exercise is not. If that happens, scale back the intensity or range of motion or stop the exercise immediately to prevent injury.
Warm up first: Spend five to ten minutes getting blood flowing before you do any shoulder work. A brisk walk, light arm swings, or a few minutes on a stationary bike all work. Cold tissues don’t respond well to loading.
Move with control: All movements should be slow and deliberate. No jerking or throwing. Keep your shoulders relaxed and your shoulder blades gently set back (not pinched hard, just not hunched forward). Think “quiet shoulders.”
Red flags that need professional attention:
- – Sudden trauma from a fall or collision
- – Inability to raise the arm above shoulder height at all
- – Constant severe night pain that doesn’t change with position
- – Visible deformity or significant swelling
- – Significant weakness that appeared suddenly after an injury
If any of these apply, see a medical provider before doing these exercises.
If you’re simply unsure whether this routine is right for you, start with fewer reps and lighter resistance. You can always work with a physical therapist in Greenville, SC to get personalized guidance.
Workout for Rotator Cuff: A Simple At-Home Routine (No Gym Required)
This routine uses minimal equipment: a light resistance band, a small towel, and optionally a light weight like a water bottle or soup can (1 to 2 pounds is plenty to start).
Perform this shoulder conditioning program two to three days per week, with at least one rest day between sessions. Give it four to six weeks of consistent effort before judging whether it’s helping.
Start with one to two sets of eight to ten reps per exercise. As tolerance improves, build up to two to three sets of ten to fifteen reps. During rotator cuff training, controlled muscle engagement and high repetitions of 15-20 are essential to activate the small muscles effectively. The routine is ordered from easier activation and mobility work to higher-load strengthening, so follow the sequence when you’re getting started.
1. Supported Pendulum Swing (Early Motion and Pain Relief)
- Starting position: Stand next to a sturdy table or counter. Place your unaffected arm on the surface for support. Lean forward slightly so your affected arm can hang straight down toward the floor, completely relaxed.
- Movement: Let your body rock gently to create small swings in the hanging arm. Move front to back, then side to side, then in small circles. The motion should come from your body shifting, not from actively lifting your shoulder.
- Tempo and duration: Spend twenty to thirty seconds in each direction. Breathe easily and keep your shoulders relaxed. Do one to two rounds.
- What it should feel like: This is a “loosen up” drill, not a strength exercise. If you have to shrug or grip to make it happen, you’re working too hard. Let gravity do the work.
Pendulum swings are effective for warming up the shoulder joint and improving mobility. This is a good choice on days when your shoulder feels extra stiff or after a flare-up. Skip it if you’ve had a recent fall or acute injury without clearance from a provider.
2. Wall Slide With Shoulder-Blade Control (Serratus and Upward Rotation Focus)
- Starting position: Stand facing a wall with your feet about twelve inches away. Place your forearms flat on the wall, elbows bent to roughly 90 degrees. You can put a small towel between each hand and the wall if that feels more comfortable.
- Movement: Slowly slide your forearms up the wall, going from a “goalpost” shape toward a “Y” shape. Focus on keeping your shoulder blades gliding smoothly on your rib cage without hiking them toward your ears. Slowly return to the starting position with control.
- Sets and reps: Two sets of eight to twelve reps. Only move within a range where pain stays mild and manageable.
- Coaching cues: Reach gently like you’re making yourself taller. Keep your ribs quiet and avoid arching your low back. Think “long neck, relaxed shoulders.”
This exercise builds coordination between your shoulder blades and rotator cuff, which is essential for overhead tasks like placing items on a shelf or reaching into a cabinet.
3. Side-Lying External Rotation With Light Weight
- Starting position: Lie on your non-painful side with your head supported on a pillow. Bend the elbow of your affected arm to 90 degrees and rest it against your side. Place a small towel roll between your elbow and ribs to keep good alignment. Hold a light enough weight in your hand (a water bottle, small dumbbell, or soup can works well). Start with your forearm resting across your belly.
- Movement: Slowly rotate your forearm upward by turning the shoulder joint like a door on a hinge. Stop when your forearm is just below vertical. Slowly lower back to the start over three to four seconds.
- Sets and reps: Two to three sets of eight to twelve reps. Add a one to two second pause at the top when you can tolerate it.
- What it should feel like: A deep fatigue in the back of your shoulder, not a sharp pain on top of it. Smaller ranges of motion are perfectly fine at first. Build gradually.
Exercises like side-lying external rotations are crucial for rotator cuff strengthening. Using a light dumbbell or resistance band can enhance the effectiveness of these exercises.
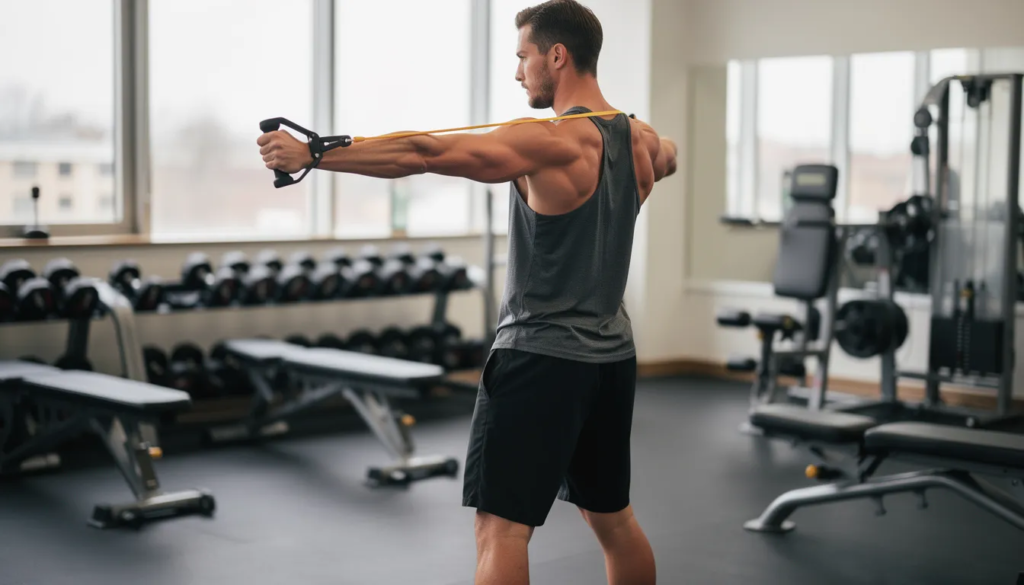
4. Band External Rotation at the Side (Standing)
This exercise progresses the same muscle group into a more functional standing position.
- Starting position: Anchor a light resistance band at about belly-button height (around a doorknob works well). Stand sideways to the anchor with your affected shoulder facing away from it. Bend your elbow to 90 degrees and tuck it at your side with a small towel roll. Hold the band with your forearm across your belly.
- Movement: Slowly rotate your forearm outward, away from your body, while keeping your elbow glued to your side. Squeeze your shoulder blades gently together as you rotate. Slowly return to the starting position.
- Sets and reps: Two to three sets of ten to fifteen reps. Keep the band tension light enough that your form stays clean and movement stays smooth.
- Progression ideas: Step farther from the anchor point, add a brief pause at the end of the range, or use a slightly firmer band once fifteen reps feel easy.
5. Band Internal Rotation at the Side (Balancing the Cuff)
This exercise targets the internal rotators to balance your shoulder external rotation work.
- Starting position: Keep the band anchored at belly-button height. Stand facing the opposite direction so your affected arm is closer to the anchor. Bend your elbow to 90 degrees with a towel roll at your side. Start with your forearm pointing away from your body, holding the band.
- Movement: Gently pull the band across your belly by rotating your shoulder inward. Stop before the front of your shoulder feels pinchy. Slowly return to start.
- Sets and reps: Two to three sets of ten to fifteen reps. Work within a range that stays pain-free or only mildly uncomfortable and calms down within 24 hours.
- Key focus: Keep the movement smooth and controlled. Don’t roll your shoulders forward or twist your trunk to cheat the motion.
6. Supported Row for Shoulder-Blade Strength (Lower Trap and Scapular Control)
This exercise strengthens the muscles of the middle back and shoulder blades that share the workload with your rotator cuff.
- Starting position: Anchor your band in front at about chest level. Stand tall with your feet shoulder width apart and your knees slightly bent. Hold the band with both hands, arms straight in front of you.
- Movement: Pull the band toward your ribs by first drawing your shoulder blades gently back and together, then bending your elbows. Squeeze at the end, then slowly return to the start with your arms straight.
- Sets and reps: Two to three sets of ten to fifteen reps. Focus on posture and avoid shrugging toward your ears.
Think of this as prep work for activities like carrying groceries, rowing on a machine, or doing push-ups without straining the front of your shoulder. Wall push-ups and modified push-ups also help enhance overall shoulder stability and strength while minimizing joint stress.
How to Progress Your Workout for Rotator Cuff Over 4–8 Weeks
Tendons and muscles adapt gradually. Consistency over weeks matters far more than any single perfect workout. Here’s a simple timeline to follow:
Weeks | Focus | What to Adjust |
|---|---|---|
1–2 | Technique and Light Resistance | Master form, use light or no weight |
3–4 | Build Volume | Add reps or sets while keeping resistance steady |
5–8 | Increase Challenge | Gradually increase band tension or weight, try more challenging angles |
Change only one variable at a time. Either add reps, add sets, or increase resistance. Not all three at once. Keep a simple log so you notice patterns in what bothers your shoulder.
Progression Checklist
Before increasing resistance or volume, ensure:
- – No sharp pain during reps
- – Soreness settles within 24 hours
- – You can complete 2 sets of 15 reps with clean form
Hold stretches for 15-30 seconds and repeat 2-4 times to maintain flexibility in the shoulder region. Stretching the muscles that you strengthen is important for restoring range of motion and preventing injury.
Good signs of progress:
- – Less night pain
- – Easier overhead reach
- – Better tolerance for household or gym tasks
- – Less fear of moving the affected arm
Occasional mild flare-ups can happen when you’re adding new demands. That’s normal. If soreness lasts more than 48 hours or your function gets worse, scale back and consider a PT check-in.
What a Physical Therapist Can Add to Your Shoulder Plan
Many people improve on their own with consistent work. But when pain has lingered for more than four to six weeks despite your best efforts, a targeted plan with professional guidance tends to speed things up significantly.
A PT evaluation typically includes a detailed history of your shoulder injury, movement and strength testing, posture and mechanics assessment, and checking how your neck and upper back might be contributing to your shoulder stress.
What PT can provide:
- – Individualized exercise progressions matched to your current ability
- – Hands-on techniques to reduce stiffness and improve range of motion
- – Taping or temporary support strategies during flare-ups
- – Education on modifying workouts, work tasks, and sleep positions
- – Guidance on when to push and when to rest
A PT can also help sort out whether your pain is coming primarily from the rotator cuff, your neck, a labral issue, or something else that needs different care. The right diagnosis changes the game plan.
At Movement Solutions Physical Therapy, the goal is always helping people return to what they care about most. Whether that’s lifting, running, CrossFit, golf, or simply playing with kids and grandkids, the focus is on getting you moving confidently again without relying on long-term rest or repeated injections.
When to See a Professional Instead of Just Doing Home Workouts
Sometimes the smarter path is getting evaluated before spending weeks on home exercises. Here’s when to seek help:
- – Sudden onset of intense pain after a fall, collision, or heavy lift
- – Inability to raise your injured arm more than a few inches
- – Significant weakness on the affected shoulder compared to the other arm
- – A feeling that your shoulder is slipping or unstable
- – Persistent night pain that wakes you several times per week for more than two to three weeks
If you have a history of shoulder surgery, inflammatory conditions, or long-standing diabetes, get guidance before doing aggressive strengthening on your own. These situations can change how tissues heal.
Getting evaluated does not automatically mean surgery. In many cases, a structured rehab plan is enough to restore function and get you back to the activities you love. An assessment gives you information, not a sentence.
FAQs About Workout for Rotator Cuff and Shoulder Pain
Is It Okay To Exercise If My Shoulder Still Hurts?
In many cases, yes. The key is distinguishing between manageable muscle soreness or mild discomfort and pain that signals damage. If discomfort stays below a 4 out of 10, improves as you warm up, and settles within 24 hours, you’re likely fine to continue. Sharp, catching, or worsening pain is a signal to stop and reassess.
How Long Does It Usually Take To Feel Improvement?
Many people notice some positive changes within four to six weeks of consistent work. Significant improvement often takes eight to twelve weeks, depending on how long symptoms have been present, the severity of the rotator cuff injury, and how consistently you exercise slowly and progressively. Patience and persistence pay off.
Should I Stop All Upper-Body Training?
Usually not. Most people can train around the issue with appropriate modifications. You might temporarily avoid movements that aggravate symptoms (like heavy overhead pressing or wide-grip bench) while continuing exercises that feel fine (like neutral-grip rows or farmer’s carries). A physical therapist can help you figure out what stays and what goes.
Do I Need An X-Ray Or MRI?
Imaging can be helpful in some situations, but many findings on MRIs (like partial rotator cuff tears or tendon changes) are common even in people with no pain at all. What matters most is how your shoulder functions, not what the picture looks like. Clinical evaluation, movement testing, and your response to treatment tell us more than imaging alone.
Can I Do These Exercises Every Day?
For most people, two to three days per week with rest days in between works best. Your muscles need time to adapt and recover. If you want to do something daily, stick to the pendulum swings and light stretching on off days, and save the strengthening work for your scheduled sessions.
Ready for Guidance on Your Workout for Rotator Cuff? (Greenville, SC)
If you’re tired of guessing which shoulder exercises are safe and which ones might make things worse, you’re not alone. A shoulder that cooperates with your life is within reach. You just need the right plan.
A good rotator cuff program should help you lift, reach, and sleep with less pain. It should make you more confident in your body, not more afraid to move.
If you’re ready to stop guessing, schedule a one-on-one evaluation at Movement Solutions Physical Therapy in Greenville, SC. Appointments are tailored to active adults who want to keep moving and get back to what they love.
Not ready to book? That’s fine too. Reach out with a question about your shoulder or your current workout, and a physical therapist will point you in a safe direction.
Your shoulder can feel strong and trustworthy again. Let’s get you back to the hobbies, sports, and daily tasks that matter most to you.
